
One of the most delicious, nutritious, and adaptable dishes you can prepare at home is yogurt. Homemade yogurt is fresh, devoid of preservatives, and totally customizable, whether you want to eat it by itself, add it to smoothies, or use it in your cuisine. The best part is that it’s shockingly easy to make! In your kitchen, you can make your own creamy, tangy yogurt with a few simple ingredients and a little perseverance.
A timeless custom that makes one’s kitchen happy is making yogurt at home. In addition to being less expensive, healthier, and tastier than the majority of store-bought varieties, it also stays away from needless additives. Whether you’re a yogurt lover or simply searching for a new culinary experience, this book will cover everything you could possibly need to know to make the best homemade yogurt.
What You’ll Need
Before beginning, make sure you have all the necessary supplies and ingredients. The procedure will be simpler and more pleasurable as a result.
Ingredients:
You can use skim milk, 2% milk, or whole milk.Starter Culture: A few tablespoons of any plain yogurt with live active cultures, or a powdered yogurt starter.
Basic Equipment:
A heavy-bottomed pot
A thermometer-preferably a digital one
A whisk or spoon
A container with a lid for incubation
A warm place for fermenting-over, yogurt maker, or Instant Pot
Understanding the Basics of Yogurt-Making
Yogurt is a fermentation of milk with the help of some living bacteria. The bacteria turn lactose, a natural sugar contained in milk, into lactic acid and that thickens the milk, giving yogurt its specific, sour taste. Well, the process is as simple as warming up the milk, adding a starter, and incubating it until it sets.
Choosing Your Ingredients
The taste and texture of your yogurt will be directly impacted by the quality of the ingredients.
Best Milk for Yogurt:
Whole milk produces the creamiest yogurt.
Low-fat or skim milk would be good for lighter yogurt but may need thickening agents added, like powdered milk.
Yogurt Starter Cultures:
Use any kind of plain yogurt that is living and active. Check the label for active microorganisms such as Lactobacillus bulgaricus and Streptococcus thermophilus.
Alternatively, you may buy a powdered starter from a health food store.
Preparing the Milk
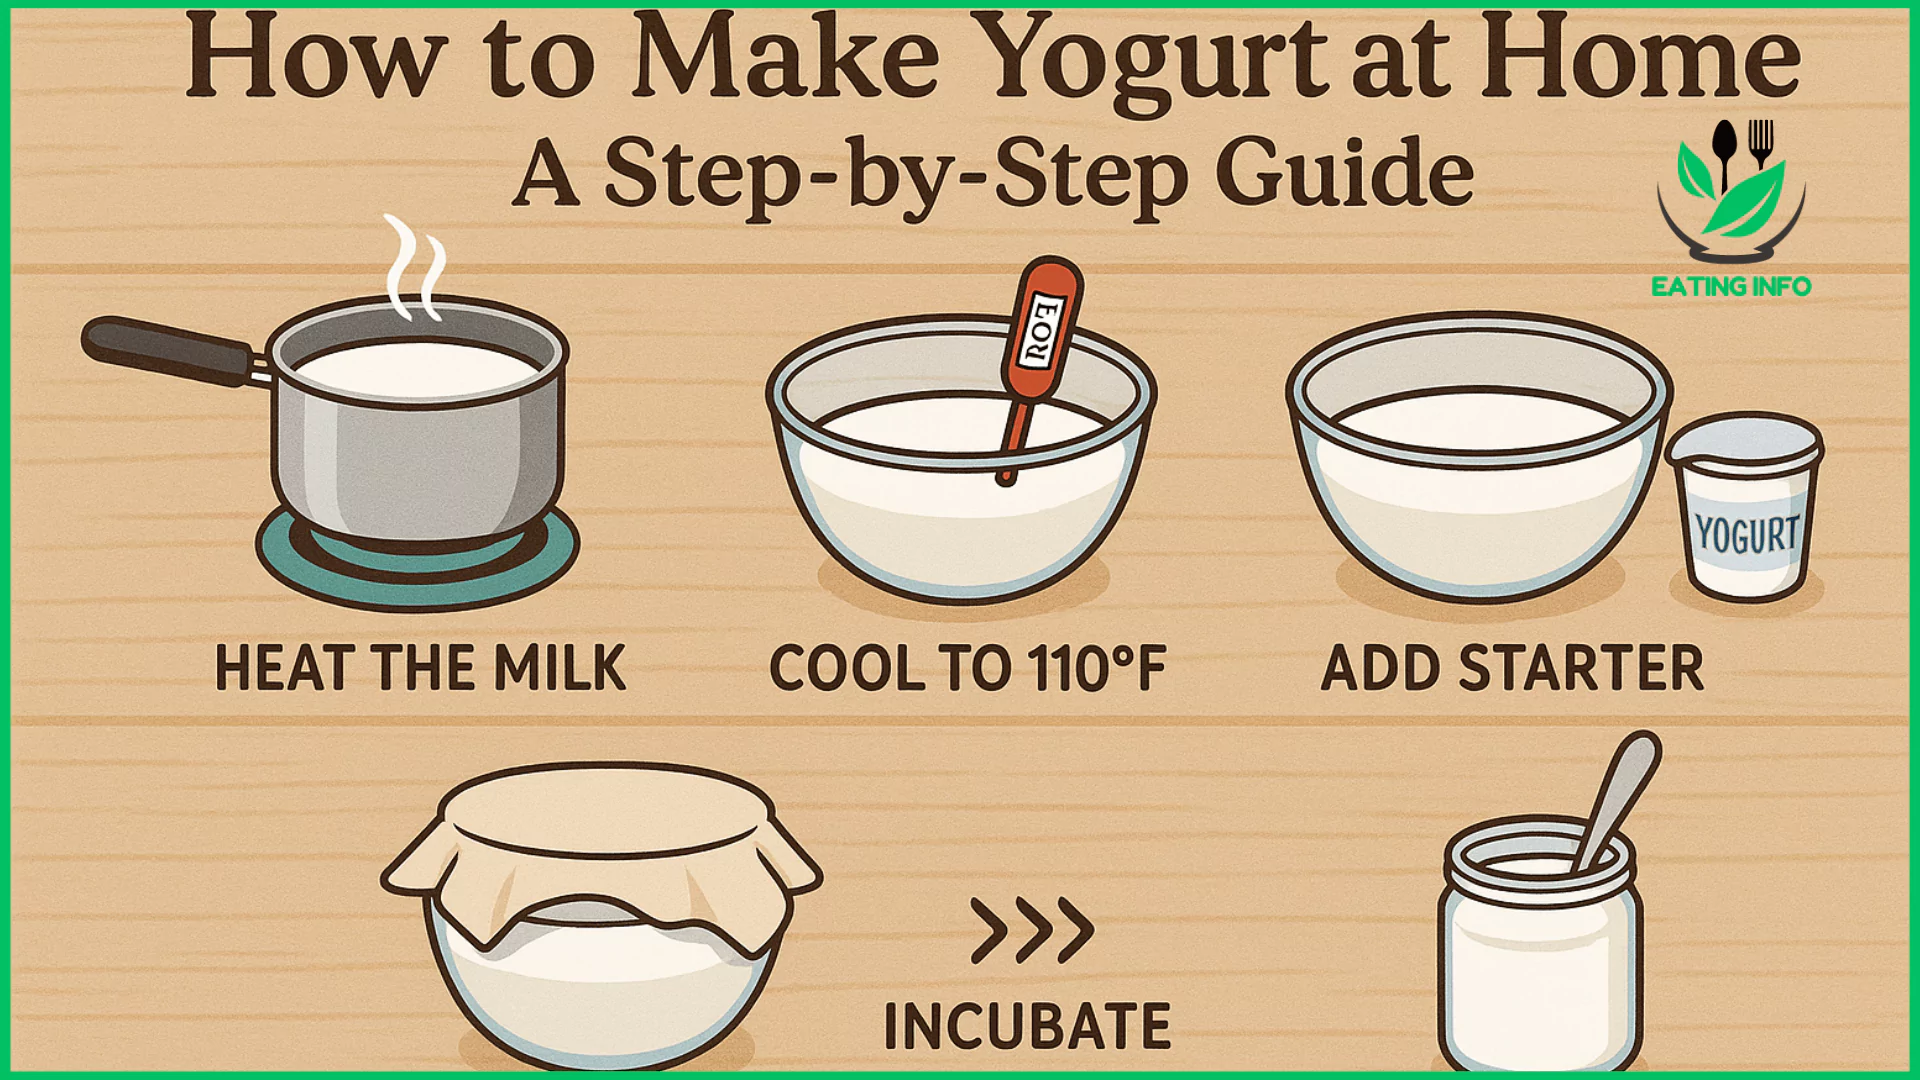
Step 1: Heat the Milk
Pour your milk into a pot and heat it over medium heat until it reaches 180°F (82°C). This will kill any unwanted bacteria and help to set the milk proteins during fermentation.
Step 2: Cool the Milk
Pull the pot from the heat and let it cool down to about 110°F / 43°C. This will be at an ideal temperature to add starter culture: warm enough for good bacteria to grow in, yet not so hot it kills the bacteria.
Adding the Starter Culture
Once cooled, it is time to add the yogurt starter.
Take some of the warmed milk and mix it with the starter culture in a separate bowl. This is to ensure an even distribution of the culture.
Return it to the pot and stir well without being vigorous.
Incubating the Yogurt
Incubation will take care of the magic of milk turning into yogurt. During the incubation process, the living bacteria take action.
Temperature Maintenance:
Let the mixture incubate at a consistent 110°F (43°C) for 6–12 hours. You can do this using:
Oven Method: Place the saucepan with the light on in a warm (not hot) oven.
Yogurt Maker: For reliable results, use a specialized yogurt maker.
Slow Cooker: Place the pot in a slow cooker that has been turned off after wrapping it with towels.
Checking for Doneness
After 6 to 12 hours, carefully turn the jar to check the yogurt. If it is set and has a creamy texture, it is ready. The longer you leave it, the more tangy it will become.
Chilling and Storing the Yogurt
Allow the yogurt to cool to room temperature, for about 30 minutes, then transfer it to the refrigerator. Chill for at least 2 hours for flavors and texture development. Store in airtight containers.
Common Mistakes and How to Avoid Them
Runny Yogurt:
Before adding the starting, let the milk reach 180°F and then let it cool to 110°F. Use fresh starters with active cultures.
Too Sour Yogurt:
Reduce incubation time for a milder flavor.
Greek Yogurt
For thicker, creamier yogurt, strain off excess whey:
Line a colander with cheesecloth or a coffee filter.
Place it over a bowl and pour in the yogurt.
Depending on the thickness you want, let it strain in the fridge for two to six hours.
Add your favorite flavors and mix-ins to elevate your yogurt:
Fruit Flavors: Mix in fresh fruits, pureed berries, or jams.
Sweeteners: Use honey, maple syrup, or vanilla extract.
Spices: Add cinnamon, nutmeg, or cardamom for a different twist.
Health Benefits of Yogurt
Homemade yogurt is rich in probiotics, which support gut health and digestion. It’s also an excellent source of calcium, protein, and vitamins, making it a powerhouse of nutrition.
Using Homemade Yogurt
Homemade yogurt is very versatile:
Enjoy it plain or with granola and fruits.
Use it as a foundation for dips, sauces, or smoothies.
Add to baked goods or cook with it for extra creaminess.
Making yogurt at home is a rewarding and relatively easy process that produces delicious and healthy results. You can make a creamy treat that is personalized to your taste with just a few ingredients and some patience. Why wait? Get started making yogurt today and experience the joy of creating your very own dairy delight.
FAQs
Can I make yogurt without a thermometer?
Well, yes, but with a thermometer, it is really accurate. If you don’t have one, you can check the milk with your finger; it should feel warm, not hot, before adding the starter.
Can I use non-dairy milk?
Of course, you may take coconut, almond, or soy milk, but you will probably want to add a thickener, such as agar or tapioca starch.
How long does homemade yogurt last?
This will keep for up to 2 weeks if stored properly in the refrigerator.
What do I do with leftover whey?
Use in smoothies, soup, or baking-most any place you would use water or milk.
Why is my yogurt grainy?
It may be because the milk was heated too high or the cultures were not stirred in thoroughly.